Here are the highlights from the news articles I added to my public Diigo Library this week.
Stuyvesant Students Describe Rationale for Cheating - NYTimes.com
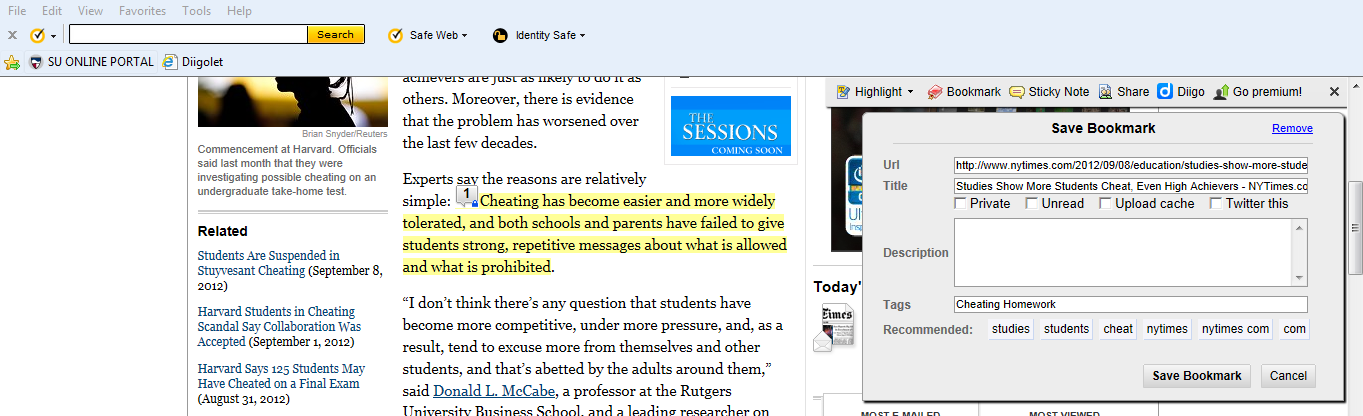
This article provides some insite into why students cheat and how they justify it.
Parents Pitch In to Help Texas Schools Face Budget Cuts - NYTimes.com
A public school in Texas has a new outdoor classroom thanks to parents and other volunteers. But has this created inequality in the public school system?
Feedback for Learning:Seven Keys to Effective Feedback-ASCD
What is feedback and how does it influence student learning and achievement?
Check out my public Diigo Library.
Sunday, September 30, 2012
Wednesday, September 26, 2012
PowerPoint and Dropbox
Summary
Part One
This week, I was required to do
something I have done a million times before and yet I can also say that this
week I have tried and learned about more things than I have in previous weeks. I
remember when, just a few years ago, being able to create a PowerPoint made you
the cool kid in class. But, with the rate of technology, presenting a
PowerPoint in class is likely to make you the boring, unimaginative one. I have
to admit though, I find well done PowerPoints to be an efficient and effective
educational tool along with other presentation mediums and I use them all the
time. I have not yet felt prepared to move on from this technological tool. In
defense, I do always try to use new designs that will catch my students’
attention and serve as visual tools to help them remember the most essential
content. This week, the assignment was to create a PowerPoint. I took this
opportunity to explore features of PowerPoint that I have never used before or
have not fully experimented with.
Part Two
Whenever I take my PowerPoints
to school, I email them to myself and put them on my flash drive because I
can’t bring my laptop (which I use to create my PowerPoints). This is not
always an easy and safe procedure. There have been occasions when I have not
had access to my email account or when the file didn’t save or send properly.
Dropbox, a cloud application, may just solve all of my problems. Dropbox can be
downloaded to your computer and is available online by registering. By dragging
and dropping a file into a Dropbox folder within My Computer. By doing so, the
file magically appears within a personal Dropbox account folder online. The file
can then be shared with others, no emailing required!
What I Did
I created a PowerPoint that is
drastically different from any other I have made. I recently learned that when
movement is involved in educational presentations, students are better able to
remember content, and therefore, I added animations to my PowerPoint. I also
included sound effects that will hopefully bring life to the lesson. I limited
my use of informational text as much as possible (which is not my strong suit,
clearly), I synthesized shapes and background styles to create slides with
unique backgrounds, and I added a video. My PowerPoint corresponds to standard
5.6 and 5.7 of the Virginia Standards of Learning as it is a review of the
seafloor with connections to erosion and weathering; it will hopefully keep any
fifth grader’s attention and interest.
I made
my PowerPoint available for viewing by putting it in Dropbox and copying and
pasting the link proved within my blog.
What I Learned
This
time I’m going to have to turn this section into a list. Get ready, it’s long…
PowerPoint Related
·
How to animate text
·
In a given order
·
one or more sections of text at a time
·
How to add sound effects
·
How to change the color of a background style
·
How to use shapes in different ways
·
How to set a photo within a shape
·
How to change the width and height of beveling
effects
Dropbox Related
·
Dropbox is simple to use
·
Dropbox can be used for personal purposes or to
share files
·
The size of the file doesn’t matter
·
Files can be drag and dropped, they do not need
to be uploaded.
How I Would Use It
Both
teachers and students can use PowerPoint to present information. I like to use
PowerPoint to include written directions in lessons that can be easily
referenced throughout a lesson, to have easy access to videos for lessons, and
supply information in a visual format (as opposed to an unaccompanied lecture)
for students with a visual learning style. Asking students to create
PowerPoints, allows them to choose information to present that they think is
most important and interesting through while tapping into their creativity
through design.
Standards Reflection
As PowerPoint is a digital tool
that incites creative and critical thought in its user, in order to present
relevant information to reach individuals with multimodal learning styles, I
believe that the use of PowerPoint in the classroom meets all of ISTE-NETS-T’s standards and the majority of their
components.
When
teachers use Dropbox to share files, they are collaborating to communicate
ideas in a way that promotes efficiency in the workplace and therefore, they
meet standard three of the ISTE-NETS-T’s standards.
Monday, September 24, 2012
Diigo: Week 3
I have added three new articles to my Diigo Library. Here is a highlight of the articles for this week.
The Myth of the Culture of Poverty by Paul Gorski-ASCD.org
Students from low-income families are being stereotyped by teachers. This article lists some of the common beliefs about parents and students living in poverty and offers insight into the realities of their struggles. With this information, teachers may better understand how to reach these individuals.
Education Site Expands Slate of Universities and Courses by Tamar Lewin-NYTimes.com
Coursera expands to include more partners and more courses.
Newark Eyes Merit Pay for Teachers by Lisa Fleisher-CNN.com
A few states in the U.S. have instituted merit pay for teachers but for NJ, Newark's negotiations with the state's infamous teachers union may bring groundbreaking change.
Check out my Public Diigo Library.
Friday, September 21, 2012
Map:Google Earth
Summary
Good. Better. Best. The staff at
Google never stops to rest when it comes to their applications. Google Earth 6.2 is the most rich and versatile
Google mapping tool yet. What’s
better, your personal Google Map can be imported
into Google Earth. Google Earth can be downloaded
to your desktop and used to view geological
features, buildings in 3-D, panoramic photos and more. These images
are brought to you using both hi-resolution
and low-resolution imagery. Much of
what is seen is displayed from satellites; these images may appear pixilated
and are not hi-resolution images. However, Google’s panoramic images and users self-submitted photos were most likely
taken with hi-definition cameras, they images appear less distorted. These images
are seen by operating the application similarly to Google Maps. Users are able
to zoom in and out and scroll across the terrain using a mouse. However, in Google Earth, users are also
able to “travel” using the ground level
view as opposed to a bird’s eye view. In addition, millions of pictures can
be viewed by clicking on the Polaroid icons. Hours could be spent exploring
your neighborhood, a region you’ve always wanted to travel to, the depths of
the ocean, and the wonders of the world (both natural and man-made) that you’ve
only every read about or seen on television.
With Google Earth 6.2, users are
no longer confined to exploring the far reaches of planet Earth. It is now
possible to travel around mars and throughout
the solar system.
What I Did
People
who have access to my Google Map are able to rate it, comment, and open map
with a KWL file in Google Earth. After
taking a look at Google Developers page about KWL, I learned that the acronym
stands for Keyhole Mark-Up Language
which is a file format used for
displaying geographical data (to pinpoint locations, overlay images, etc.). Using
the KWL file option, while it sounds complicated, was one of the easiest tasks
I’ve had to complete yet. With my Google Map open, I clicked “KWL” and…….well,
that was it! Google Earth opened automatically and zoomed in to show my place
marks. From there, I could use Google Earth as normal or click on the place marks to view my descriptions.

How I Use It & What I’ve Learned
I have been using Google Earth
for several years now and have even worked it into previous lessons. One of my
favorite uses for Google is the ocean feature. I have used it in the past to
explore the features of the seafloor with my students. Although, I have not
used Google Earth since it was last updated (the 6.2 version). I was
disappointed to find that the ocean feature, while it had been updated, was
less user-friendly than it had been. In the previous version, it was simple to
plunge into the ocean and scroll along the ocean floor. The updated version
drags the user down to the bottom and has them creep along the bottom by double
clicking to move forward. If there is a landform, the user will be walked into
it and then moved around it. It is a very tedious process and the landforms are
more difficult to define. Unfortunately, I will have to be careful if I choose
to do my sea floor lesson again.
Earth Science is my passion, in
looking through Google Earth lesson plans in Google for Educators,
I found a lesson for a Geological scavenger hunt. It’s the first one on the
list in this Google Lesson Plan Library.
Standards Reflection
When
teachers engage their students in the use of Google Earth in their classrooms,
they are meeting ISTE-NETS-T’s Standard
2 and its components. A typical lesson can be brought to life using Google
maps, an interactive tool that encourages students to explore and make discoveries
by following their interests. Using the varied features Google Earth offers
students can create land marks, videos, measurements, and more to share their
knowledge, develop innovative products, and provide evidence of their learning
for purposes of assessment.
Thursday, September 20, 2012
Map:Google Maps
Summary
Whether you are planning a real
field trip or an imaginary one, Google Maps can help. I once, very recently
actually, thought that Google Maps was for finding a single location or
directions from one place to another. However, I have learned that Google Maps
can be used in quite a different and spectacular way; individuals can create
their own Google Maps with unique legend icons, lines, shapes, and
descriptions. These maps can be titled, described, edited, and published to the
web. They can be saved to be either public or unlisted (a link is needed to be
able to access the map’s webpage). Creating a Google Map can be approached in two ways 1) a specific place can be searched for and a temporary placemark will appear in the location you are looking for or 2) you can zoom into the map and search within an area for places of interest. I can't imagine someone not learning something from the map during the process!
What I Did & What I Learned
I
created a cross country field trip itinerary based on a trip (Discovery)
conducted by my previous school. In the past, the teachers and students
involved in such extended trips would collaborate to create web pages dedicated
to sharing their experiences and learning with others. However, in the past
couple of years, students have been put in charge of recording this information
during their travels on a Facebook page. Doing so has allowed them to easily upload
photos and share short essays collectively. It has also allowed peers, teachers,
administrators, and families to send comments from home. In the future, the students could use Google Maps to create a summary of their trip as an artifact of their learning.
In order to create my Google Map, I explored the student’s most recent Discovery page to learn about their trip across country to Alaska and back. I took what I learned about their trip and created a map illustrating their travels and experiences. Doing so inspired me to think of similar, local experiences I could lead for my future students.

Check out my map in view my map in Google maps.
Access my Google Drive document detailing the field trip's theme and the school's mission.
To read more about the mission and objectives of Discovery as well as to learn more about recent trips, check out the Discovery Archives Page.
Check out Discovery 2011's Facebook Page.
Learn more about the school by checking out its website.
Other Things to Be Illustrated Using This
Tool
·
Underwater scuba dive
·
“The Way”
or “El Camino” to Santiago de Compostella
·
City tour
·
Museum tour
·
College tour
·
The Oregon Trial
·
Places where Laura Ingles Wilder lived
(discussed in her series of books)
·
Places in the community (study of relative and
absolute location)
·
Tour de France
·
Civil war battles
·
Civil historical sites
·
Where George Washington has traveled
·
Route 66
·
Order of State Adoption
Standards Reflection
Using Google maps coincides with the ISTE-NETS-T’s Standard 1, “b and c.”
There is no better way
to have students explore real-world issues than to take a look into their
local, national, and global communities. Doing so by traveling outside of the
classroom is best. If students in a class use Google Maps to create a record of their travels, they are required to reflect upon their experiences and learning through collaborative means using a tool meant to demonstrate understanding of geographical concepts, planning, and creative thought. But so often, traveling is simply not possible. But, traveling with the click of a mouse in Google maps still allows the teacher to
guide students to solve authentic problems regarding any geographical topic.
Tuesday, September 18, 2012
Map: Batchgeo Part 2
Recap
& Summary
Yesterday,
I collaborated with colleagues to compile a list of our locations and emails in
a spreadsheet in order to prepare for creating a Batchgeo map of our learning community. We shared a Google
spreadsheet in Google Docs which could be added to and edited at any time by
any number of people. This was much more efficient than emailing the document
and copying and pasting the data into an Excel document saved onto our
individual hard drives.
Today, I created a publicly accessable map that has
all of our locations tagged. By going to the URL here
and clicking on the tags, you can access our addresses and links to our emails.
You can also zoom in to better identify our relative locations. While we are a community of Shenandoah
University students, we are also members of a virtual learning community. Many of my colleagues I have never met
before. Being graduate students at a school with two campuses, we live
throughout an expansive area of Virginia. Creating such a map allows us to feel
a greater sense of classroom community
as it helps us to learn more about the experiences of others.
What
I Did
Batchgeo let you create a
map right from its home page. I selected all of the data from the class’s
spreadsheet, copied it, and pasted it into a box on the website. After that, I
clicked the “map now” button and Voila a screen appeared with my map! The site
gave me the option to double check the locations of the tags and to edit the
map if need be. In fact, after clicking the “Save and Continue” button, giving
my map a title and description, and the most important part, submitting my
email address, I am able to go back to edit my map any time.
What
I Learned
While I feel that I am a
proficient computer user and knowledgeable regarding using the internet as
resource, I am coming to realize how much more I can get out of these
technologies by being more of an active
than a passive user. I grew up
learning that the internet was for surfing; I have had many years to perfect using
my mouse to scroll through pages and pages worth of status updates, pictures,
videos, and text. It is about time that I started to use the internet for
purposes of creating and sharing objects to be used as resources by others.
How
I Would Use It
Until
recently, I worked at a private middle/high school that promotes experiential,
community based learning. Throughout the year (Jan-Dec) the school sets aside several
days and a few weeks for students to organize and/or be involved in off campus learning
experiences (traveling, community service, etc.). Faculty and staff arrange
many experiences for which students must choose one or have an independent
activity approved. For instance, the school is closed for one week in the
spring during which teachers and administrators lead small groups on local,
national, and international trips, each with a unique theme that corresponds to
the school’s curriculum. When all return to school, students and faculty are
encouraged to share their experiences. If students were taught to use Batchgeo,
they could create maps detailing their travels for their peers, parents, and
teachers as evidence of their learning.
Standards
Reflection
Using Batchgeo in the
classroom aligns with ISTE-NETS-T’s standard
2, parts “a,” and d.” Students are using authentic data and information with a contemporary tool to create an artifact
to be shared collaboratively in an effort to augment students’ combined
knowledge and to be formatively assessed
as evidence of learning.
View EDU 585 Learning Community in a full screen map
Monday, September 17, 2012
Diigo Library Update: Week 2
I have just added three new stories/articles to my Diigo library. Here is an overview.
NYTimes.com
Fellowships that encourage smart students to pursue knowledge and forgo the college experience in order by tackling authentic applications that will get the job done.
CNN.com
When children receive things from other, they are othen made happy for a time. But, may the process of giving lead to both immediate and long-term happiness in children's lives.
U.S.News.nbcnews.com
Michelle Rhee comments on Obama's "Race to the Top" program and Romney's ideas regarding local level control on education and vouchers for low-income studnts.
To access my public Diigo library, click here.
Batchgeo Part 1: Google Docs
Summary
Google
maps are not just for finding directions! Batchgeo allows users to create a web based Google map that indicates
essential information about a location once the location information is plugged
into a spreadsheet and copy and pasted onto the website. The application works by identifying
addresses, intersections, cities, states, and postal codes. A Google map is
served with tags that identify
places around the world. Viewers can zoom in and out and click on the tags for
additional information just as if using Google Maps.To view my blog post about Google Docs, click here.
What
I Did
When creating a Batchgeo map, first and foremost,
it is necessary to create a spreadsheet. This can be done either using
Microsoft Excel or Google Docs Spreadsheet. For this assignment, my colleagues and
I are collaborating to synchronously (in real time) create a Google Doc Spreadsheet within
which we are sharing our home
addresses (including house numbers, street names, towns, states, and zip codes)
and our email addresses. As we each input our data, Google Docs will
automatically save the document, storing all necessary information for
later retrieval. Once all data are
input into the spreadsheet, we will be able to independently engage in Part 2—accessing
Batchgeo, creating a personalized
map, sharing it publicly online, creating
a hyperlink to the map’s Batchgeo URL,
and embedding our maps in our blogs.
For privacy reasons, I will not be including a link to the class spreadsheet.
What
I Learned
I have used Google Maps for
two main purposes, 1) to get directions
and 2) to identify places of interest
in a location I am planning to visit. Once I zoom into a city or town, symbols for
theaters, restaurants, schools, etc. appear. If I am trying to identify a place
to meet a friend for dinner in a location I’m not familiar with, for instance, I
will scroll my mouse overtop of the restaurant symbols to access information
about the street address and I may even be able to see pictures, reviews, and restaurants’
URLs. I had no idea that an individual or company could create a customized map
with similar options. Since I am already familiar with using such features on Google Maps, using a map created with Batchgeo should be easy.
How
I Would Use It
In the elementary classroom, Google Docs may be
used for such things as sign-up sheets (computer use during indoor recess,
group projects, etc.). Additionally, teaching productivity may be enhanced in
elementary schools using Google Docs when applications are used to
collaboratively create and share lesson plans, notes about student performance
for team teachers, presentations for shared unit plans and lessons,
administrative sign-up sheets (bus duty, kitchen duty, etc.), parent sign-up
sheets (parent volunteers, supply list, etc.)
Standards
Reflection
The use of Google Docs as a teaching
professional best corresponds with the ISTE-NETS-T standard three and its components. I believe that Google Docs can
most thoroughly be used to enhance a teacher’s professional abilities. Working
with colleagues and parents in the school community through Google Docs allows
for the sharing of resources and knowledge, a demonstration of collaboration
and the ability to communicate ideas. Any teacher who is able to make use of
Google Docs and does so proficiently, proves themselves to be engaged in
professional advancement in the field of digital technology and able to
contribute productivity to a large community and so, successfully meets aspects
of standard three.
When teachers share Google Docs with
their students, for the purposes of collecting, organizing, or synthesizing
information, they are working within virtual environment to construct collective
knowledge on a subject, corresponding with standard
two, “a.” This is unique to the traditional school learning experience in
which students are expected to absorb the information they are given for
synthesis into their own understanding of the world, taking critical thinking
and team collaboration to a whole new level.
Friday, September 14, 2012
Computer Tutorial: Jing Screencast
Summary
I've always wondered how tech savvy individuals create tutorials. How do they capture
a video of their computer screen without using a digital
camera? Both the image in my head of a man holding a recorder up to the screen
and this question seem silly to me now that I have practiced using Jing's screencapture feature. Using Jing, I can
not only capture still screenshots, I can also capture a video of anything I do
on the computer (opening applications, typing, mouse movements, surfing the
web). In addition, I can create a voiceover
to my video by synchronously using a microphone.
I now have the power to create videos at my finger tips, but no need to worry
about having to sit through hours of my computer demonstrations; Jing reins in
the crazy by limiting video capture to five
minutes. Once a video has been created, it can be shared or saved just as
with a Jing image....that's right, Jing my videos can be published online, accessed in Jing history, and saved to My Computer. So, as I improve my computer
skills, I am able to create my very own tutorials to share with others because
teaching and sharing knowledge is what I like to do best!
What
I Did It
To capture video, I return to the
little sun at the top of my computer
screen, the constant reminder that Jing is open and ready to serve my needs. I
choose the first ray to capture, then I click
and drag my mouse to select a viewing area, just as I would to take a Jing
image. But this time, I choose the “capture
video” option. Once I choose this option, I am given three seconds before
Jing starts recording. A little bar appears allowing me to pause, finish, restart, or cancel the video. I must admit, the restart feature comes in handy.
When I’m done, I choose to share my video as a screencast or save it (videos are saved as SWF files). Figuring out what you’re going to record is the hard
part!
For this assignment, I choose to create a video tutorial demonstrating
how to embed a Youtube Video into PowerPoint. I published it to the web by
creating a screencast which is available by typing in the URL or clicking here. Finally, I saved the video to My Computer and coverted it to an AVI file that would enable me to view the document on my computer. I then uploaded the file to be embedded into this post.
I am a self taught PowerPoint user.
While I believe that I know how to create some nice looking and interesting
PowerPoints, I must admit that I am not aware of PowerPoint’s full potential. But, fter
I got the basics down, I learned that videos and other things could be embedded
into my slides. I had been including ugly URLs in my PowerPoints and watching
others do the same thing up until this time. While embedding a video is a minor
trick, I believe it demonstrates a more thorough knowledge of the technology available
to me, in other words, it makes me look like I know what I’m doing.
How
I Would Use It
There are many possibilities with Jing screencast. Jing’s website even shares
how some educators have discovered ways to use Jing in their own classrooms. Once
teacher uses Jing screencast to provide homework help for her students while
another uses it to grade students’ papers. Overall, I like the idea of using
Jing screencast to record how-to videos
for math, science, and language arts on a SmartBoard. These types of videos can
have multiple uses. For instance, a teacher can demonstrate a new mathematics
skill using Jing on the SmartBoard and create a link or embed the video in her
classroom’s website. Students can access the video when they need a refresher after
school while working on homework, when they need help while working
independently in the classroom, when they are working at centers, and when they
have been absent. Using Jing for such a purpose can elevate some of the
everyday problems teachers face.
Issue
#1
Giving homework is a controversial
issue these days. Many students do not have the support they need at home in
order to learn effectively from their homework. One of my professors likes to
say, “Practice doesn’t make perfect, practice makes permanent.” We are doing a
disservice to our students when we have them go home with to practice a new
skill with a twenty question worksheet and all they have done is practiced the
skill incorrectly twenty times because they forgot the intricacies of the skill
and didn’t have the help they needed. By providing how-to video’s to students,
there is a better chance that students will be practicing skills correctly.
This way, students are receiving the extra practice they need, although I do
believe that grades for homework still should not be used in grade books.

Issue
#2
Grading is a whole other issue. Teachers take a
large amount of precious time in class to grading and correcting homework with
students. I see three things wrong with this. Firstly, time could be better
spent. Secondly, many students choose not to follow along. Finally, the pace
may be too fast for some to follow and the chance that any student is
internalizing why they got a problem wrong is slim to none. Instead, a teacher
could fill out an answer key using the SmartBoard and Jing, and have students
grade their own work at home. A strict honor policy would need to be in place
and students would need to be required to make corrections obvious. Focus is
then placed on mastery instead of collecting grades for the gradebook.
Issue
#3
I’ve heard of a lot of creative ideas educators have come up with for
keeping peace and quiet while working with a group of students at the guided
reading table, this is one of them.
When students work independently, when the teacher is
helping a small group or when working at centers,
hands are constantly flying in the air or the teacher and her group is getting interrupted.
If your classroom has iPads or a computer, one way to alleviate this issue is
to record directions or examples
using Jing. iPads and computers can be accessed by students independently and
can often be passed around the room. Using Jing in this way could be both a
time and energy saver and it requires students to become more independent.
What
I Learned
My logical mind tells me that there
are many technologies I have yet to discover and learn how to use and that
learning about them could lead to professional development. However, it wasn’t
until now that I have discovered an application that I feel could greatly
influence and improve my practice as an educator. Sure, there are websites I
could use for research, lesson planning, and that I could introduce my students
to but, (here comes the part that no
higher-up wants to here) I already have a repertoire of digital resources and
am comfortable using what I already know.
I have learned to use many technologies and how to incorporate them
into my teaching in just a few years. But, since I haven’t had my own classroom
yet, it is difficult to think about improving my practice and ditching old
ideas for new ones! However, today it has truly been impressed upon me that there
are still technologies worth finding because while I don’t want to be a teacher
who shoves technology down her student’s throat, I want to be a teacher who can
reinvent the classroom. After applications are made people discover how to use
them in ways the inventor never even thought of. By synthesizing what I learn
about new tools, perhaps I can discover a way to use them to transform the
classroom in a way no one has thought of yet.
Standards
Reflection
Teachers using Jing meet ISTE-NETS-T’s
standard 2, sections “a, c, and d,”
by adapting a learning experience through
a digital resource that can be used
by students with diverse learning styles
(visual, auditory) and diverse working
strategies (whole group, small group, independent work) or that could be
used for assessment purposes. They
also meet standard 3, section “a”
for demonstrating technological fluency
by communicating with students using
a video media format. Additionally, teachers meet standard 5, section “d” for evolves and renews classroom management in such a way that makes class time
more efficient, teaching more effective and contributes to the vitality of homework.
Tuesday, September 11, 2012
Image Grab:Jing
Summary
While I found Microsoft’s
Snipping Tool to be an efficient tool for capturing
an image, I was frustrated with it pen feature; luckily, Jing has a similar tool that offers two things the Snipping Tool does not. Like the
Snipping Tool, Jing allows the user to capture a cropped
portion of his or her active screen and alter the picture for emphasis. Unlike the
Snipping Tool, Jing has text, frame, and arrow
features. Many color options are available
to adjust the way these features look on top of an image. Additionally, Jing
has sharing capabilities. Using the ScreenCast option, the user publishes their image online and makes it accessible with a ScreenCast URL.
What I Did
To use Jing, I downloaded it for free to my
computer and went through a quick and easy set-up
process. During the set-up process, I chose to have Jing start up with my
computer. Now, when I turn on my computer, a small sun
appears at the top of my screen. Clicking on the sun allows me to capture a new
image and to view my history. An image is
selected as with the Snipping Tool, by holding down and dragging the mouse to
highlight the area of interest. The additional features are used in a similar
way. Once I found an image I could use, I captured it, added frames, arrows,
and text, the pressed the ScreenCast button as opposed to saving it directly on
my computer. I had to wait a moment for the process to be completed. Afterwards,
I decided to save the picture for extra measure so I right clicked on the image
and choose, “save as picture as....” Jing creates
all images as PNG files.
How I Would Use It
I’m
certain there are a million things that could be done with this tool. However,
I think I would use it most to present
labeled images to my future elementary students. For example, to teach the vocabulary associated with the features
of coastal erosion for an oceanography unit, I can frame the features I want
students to be familiar with, differentiate them by using a different color for
each, and draw labels with vocabulary words using the text feature. To make
sure no one gets confused, I can add arrows from the text boxes to the frames
to make it clear.

 |
| I import Jing images just as I would any other image. After I have saved a Jing image and while I am creating a blog post, I click on the image of a Polaroid photo on my Blogger post tool bar which gives me the option to browse my files in My Computer. I find the image I want and select “Open,” then “Add Selected.” The image then appears within my post. |
To access and capture free photographs I used Foter which
provides hundreds of beautiful, quality photographs organized within searchable
categories.
Q&A
How/where do you save images on your computer?
Using Print Screen, the Snipping
Tool, and Jing allows me to capture images to save to my computer. The Snipping
Tool and Jing provide a saving option. Using this option, I usually choose to
save my images to either “Pictures” or “My Documents” within My Computer.
Otherwise, I simply save images by right clicking on the image using my mouse,
and choosing “save picture as…”
How do you access you Jing history?
The little sun that appears when
I have Jing open gives me three options when I scroll my mouse over it.
Clicking on the center option will open up my Jing history. Here I can view,
share, or delete any of the Jing images I have created.
How do you publish your artifact?
After creating my artifact, I
can publish it by choosing the ScreenCast option. I can do this in at least two
places. Just after selecting the image I am served the option to create the
ScreenCast. Or, I can save the image and access my image in my Jing History
where it once again gives me the option to create the ScreenCast.
What happens if you ScreenCast an item in your history?
The image I created opens up in
a new window. Here I can copy the URL to the ScreenCast. This allows me to paste
the ScreenCast in a location where it can be referenced by others.
How do you share your artifact with others?
To access my first image through
ScreenCast, click here.
To access my second image
through Screen Cast, click here.
Standards Reflection
Using Jing to design new,
digital resources that facilitate student learning applies to ISTE-NETS-T’s standard one part “a” and standard two, parts “a” and
“c.” When a teacher is able to take a product and adapt it using digital
tools, such as Jing, to create a new learning tool based upon their subject
matter knowledge, they are not only meeting these standards but demonstrating
their ability to think creatively, use tools innovatively, and invent new
learning products. Such activity is bound to inspire young minds!
Sunday, September 9, 2012
Social Bookmarking: Diigo
Summary
All Internet browsers allow users to save, organize, and gain easy access
to their favorite websites but Web 2.0
technology has combined bookmarking
with social networking to bring
Internet users social bookmarking.
One such social bookmarking site, Diigo, provides a browser add-on, allowing users to highlight, comment, bookmark, and share (through facebook, twitter, and
email) webpages and online articles. But, that only describes its bookmarking
capabilities. Diigo provides an online
library where bookmarks are stored. This library can be accessed by the
public, other Diigo users, or by friends (depending upon the user’s privacy
settings). Diigo makes bookmarking social by connecting users with content and people based on location,
language, and content preferences. Groups can be created through which “members”
can collect and share digital information for a common goal: to provide
resources, to inform, to open discussion, etc.
What
I Did
A user can decide how
extensively they which to make use of Diigo’s services. Diigo’s website offers
videos for general information and tutorials to get you started. Before I began
using the site I viewed this Youtube video
which introduced me to Diigo’s most basic features and encouraged me to use its
more social features for a greater experience.
To get started, the video recommended 1) using the
browser add-on to highlight and annotate online articles, 2) using the add-on
to bookmark those articles and tag
them using keywords, and 3) using the personal library to organize bookmarks in
lists.
To use the site’s more extensive features, the video
recommended 1) checking out what Diigo friends are interested in, what
interests are shared in common, 2) messaging Diigo friends and 3) participating
in groups.
After registering for Diigo, I updated my profile,
setting preferences that will allow Diigo to make suggestions for me, I
adjusted my settings to provide me with a comfortable level of security, and I
began searching for interesting articles to read online. Once I found an
interesting article, I clicked on the Diigolet add-on, I clicked on bookmark which
allowed me to add a title, description, and tags. Then I highlighted and added
comments throughout the article to sections I found particularly important or
intriguing. I went into my Diigo library. I was interested to see that
not only did the title of the article, its description, and its tags appear,
but everything that I highlighted and all of my comments appeared as well.

The ability to see these things, I believe, makes the tool very valuable although, I think that as I add more articles, the page will become difficult to look at and sort through. It seems that the list feature may come in handy to midigate this problem.

The ability to see these things, I believe, makes the tool very valuable although, I think that as I add more articles, the page will become difficult to look at and sort through. It seems that the list feature may come in handy to midigate this problem.
To see my public Diigo library click here.
Q&A
What is Web 2.0?
Web 2.0 is different from previous stages of the
web as it is based on user generated content as opposed to serving content
created for users. Web 2.0 combines social
media and publishing techniques in ways that enable users to collaborate in
virtual communities with the purpose of sharing information.
What is social bookmarking?
Social bookmarking sites are for Internet users to
acquire, archive, tag, and share online resources within an online community.
What are advantages to social bookmarking?
The World Wide Web expands by the second. Somewhere
online is the relevant, informational, or interesting resource I’ve been
looking for. Once I find it by sifting through all the sites that don’t meet my
criteria, instead of keeping it to myself, I can
share this resource with others through social bookmarking. The process of online research is then
streamlined for others who have the same interests and needs that I do.
What is a browser add-on and why are they useful?
Browser add-ons are tools that appear in one’s
Internet browser that provide additional functionalities for online sites and applications
such as Amazon’s “Add to Wish List” button. They are allow popular websites to be used in effective and efficient ways that work for the user.
What browser do you use?
Internet Explorer.
What is your experience with browser add-ons?
I have had very little experience with browser add-ons.
Did you get your add on to work?
Yes.
What browser add-ons are you currently using?
Internet Explorer Bookmark, Diigo, Norton Security.
How
I Would Use It
Age restrictions apply to many social media sites
and their use is therefore inappropriate in schools. For this assignment, I read an article that suggests this tool may motivate school age students to read and encourage them to participate in discussions about readings. This may be true for
high school students but I would be weary of using such technology (parent
permission would be required) and it certainly has no place in the elementary
classroom. However, if used by staff and faculty within a school system, professional
development would be put on a fast track. Online resources for classroom use
and recent research in the field could be shared and debates could be raised
over important issues through a Diigo group by colleagues.
Standards
Reflection
A
teacher using Diigo would be meeting Standard
5 of the ISTE-NETS-T standards,
particularly sections a, c, and d. When teachers communicate and share ideas regarding
teaching and learning with others through Diigo, especially when networking in
a group, they are teaching and learning in a virtual place with multiple communities.
As they research articles and read articles found by others, they are thinking
critically about information that could influence their practices in the
classroom. If teachers in a school or school system participate and collaborate
within a Diigo group, they are promoting the modern advancement of their
school community and classrooms.
Friday, September 7, 2012
Self Portrait: Picassohead
Summary
Expressing yourself can be difficult, but not when
you have the internet at your fingertips, especially with websites like
Picassohead. Picassohead offers a digital canvas and supplies the user with
facial features that almost look like they have been copy and pasted from Pablo
Picasso’s paintings. The possibilities are endless as you can use color on,
rotate, resize, and flip each feature. If you look past the apparent uses of
each feature it is possible to create complex facial characteristics and express
complex emotions.
 Before creating my own Picassohead, I looked at the
website’s gallery. I was surprised at some of the ways people thought to use the
creation tools. I knew that I had to be open minded about my approach if I
wanted to create something unique like my fellow artists. Using mostly the eyebrow feature, I created the portrait displayed left.
Before creating my own Picassohead, I looked at the
website’s gallery. I was surprised at some of the ways people thought to use the
creation tools. I knew that I had to be open minded about my approach if I
wanted to create something unique like my fellow artists. Using mostly the eyebrow feature, I created the portrait displayed left. To view my portrait on the Picassohead website click here.
While my Picassohead may not look like me, it represents me in two ways 1) I made a curtain with lips to illustrate a stage; I’m a dancer and love to perform and 2) I went for a symmetrical look instead of taking a cubist approach as Pablo Picasso may have; I feel most comfortable when things are orderly.
This website was fun to use as I didn’t even know exactly what my portrait was going to end up looking like. At the start, I was going for unique and original. I tried to look at the facial features in unique ways and to use them differently. To my surprise, I ended up with the most typical looking female! If I were to create another Picassohead, I’m sure it would wind up looking wildly different.
Learning
Objective
At one point during the
creation process, I got frustrated that I could not move features once I placed
them on the “canvas.” I would try to move a small object and the boarder of a
larger object made it impossible for me to access what I wanted. However, I
discovered that by sending the larger feature backward, I could access the
smaller one. I had a feeling this would work as I am familiar with using the “Send
to Back” and “Send to Front” options available for pictures and clip art in
Microsoft Word and PowerPoint.
How
I Would Use It
Ice breakers can help you
and your students to feel more comfortable at the start of a new school year
and encourage classroom community. Since Picassohead has three step directions
and only requires the use of a mouse, it is a simple, low-risk, activity for
the computer lab which can allow students and even the teacher to introduce
themselves to a new class.
Standards
Reflection
Picassohead.com is a
virtual art gallery that can store your very own online creations. Using this
tool in the classroom would meet Standard
1 “b” of the ISTE-NETS-T’s standards. Creativity is often expressed when
old ideas are synthesized to create something new. By encouraging students to
use this tool, students will become inspired by the ideas of a famous artist to
express themselves and their ideas in ways never seen before. By stretching students’
imaginations through creativity, they are set on the road towards innovative
and inventive thought.
Subscribe to:
Posts (Atom)