Friday, September 14, 2012

Computer Tutorial: Jing Screencast

Summary
I've always wondered how tech savvy individuals create tutorials. How do they capture a video of their computer screen without using a digital camera? Both the image in my head of a man holding a recorder up to the screen and this question seem silly to me now that I have practiced using Jing's screencapture feature. Using Jing, I can not only capture still screenshots, I can also capture a video of anything I do on the computer (opening applications, typing, mouse movements, surfing the web). In addition, I can create a voiceover to my video by synchronously using a microphone. I now have the power to create videos at my finger tips, but no need to worry about having to sit through hours of my computer demonstrations; Jing reins in the crazy by limiting video capture to five minutes. Once a video has been created, it can be shared or saved just as with a Jing image....that's right, Jing my videos can be published online, accessed in Jing history, and saved to My Computer. So, as I improve my computer skills, I am able to create my very own tutorials to share with others because teaching and sharing knowledge is what I like to do best!


What I Did It
            To capture video, I return to the little sun at the top of my computer screen, the constant reminder that Jing is open and ready to serve my needs. I choose the first ray to capture, then I click and drag my mouse to select a viewing area, just as I would to take a Jing image. But this time, I choose the “capture video” option. Once I choose this option, I am given three seconds before Jing starts recording. A little bar appears allowing me to pause, finish, restart, or cancel the video. I must admit, the restart feature comes in handy. When I’m done, I choose to share my video as a screencast or save it (videos are saved as SWF files). Figuring out what you’re going to record is the hard part!

 
For this assignment, I choose to create a video tutorial demonstrating how to embed a Youtube Video into PowerPoint. I published it to the web by creating a screencast which is available by typing in the URL or clicking here. Finally, I saved the video to My Computer and coverted it to an AVI file that would enable me to view the document on my computer. I then uploaded the file to be embedded into this post.


            I am a self taught PowerPoint user. While I believe that I know how to create some nice looking and interesting PowerPoints, I must admit that I am not aware of PowerPoint’s full potential. But, fter I got the basics down, I learned that videos and other things could be embedded into my slides. I had been including ugly URLs in my PowerPoints and watching others do the same thing up until this time. While embedding a video is a minor trick, I believe it demonstrates a more thorough knowledge of the technology available to me, in other words, it makes me look like I know what I’m doing.
 
 
How I Would Use It
There are many possibilities with Jing screencast. Jing’s website even shares how some educators have discovered ways to use Jing in their own classrooms. Once teacher uses Jing screencast to provide homework help for her students while another uses it to grade students’ papers. Overall, I like the idea of using Jing screencast to record how-to videos for math, science, and language arts on a SmartBoard. These types of videos can have multiple uses. For instance, a teacher can demonstrate a new mathematics skill using Jing on the SmartBoard and create a link or embed the video in her classroom’s website. Students can access the video when they need a refresher after school while working on homework, when they need help while working independently in the classroom, when they are working at centers, and when they have been absent. Using Jing for such a purpose can elevate some of the everyday problems teachers face.

 
Issue #1
Giving homework is a controversial issue these days. Many students do not have the support they need at home in order to learn effectively from their homework. One of my professors likes to say, “Practice doesn’t make perfect, practice makes permanent.” We are doing a disservice to our students when we have them go home with to practice a new skill with a twenty question worksheet and all they have done is practiced the skill incorrectly twenty times because they forgot the intricacies of the skill and didn’t have the help they needed. By providing how-to video’s to students, there is a better chance that students will be practicing skills correctly. This way, students are receiving the extra practice they need, although I do believe that grades for homework still should not be used in grade books.

Issue #2
Grading is a whole other issue. Teachers take a large amount of precious time in class to grading and correcting homework with students. I see three things wrong with this. Firstly, time could be better spent. Secondly, many students choose not to follow along. Finally, the pace may be too fast for some to follow and the chance that any student is internalizing why they got a problem wrong is slim to none. Instead, a teacher could fill out an answer key using the SmartBoard and Jing, and have students grade their own work at home. A strict honor policy would need to be in place and students would need to be required to make corrections obvious. Focus is then placed on mastery instead of collecting grades for the gradebook.
 
 
Issue #3
I’ve heard of a lot of creative ideas educators have come up with for keeping peace and quiet while working with a group of students at the guided reading table, this is one of them.
When students work independently, when the teacher is helping a small group or when working at centers, hands are constantly flying in the air or the teacher and her group is getting interrupted. If your classroom has iPads or a computer, one way to alleviate this issue is to record directions or examples using Jing. iPads and computers can be accessed by students independently and can often be passed around the room. Using Jing in this way could be both a time and energy saver and it requires students to become more independent.
 
 
What I Learned
            My logical mind tells me that there are many technologies I have yet to discover and learn how to use and that learning about them could lead to professional development. However, it wasn’t until now that I have discovered an application that I feel could greatly influence and improve my practice as an educator. Sure, there are websites I could use for research, lesson planning, and that I could introduce my students to but, (here comes the part that no higher-up wants to here) I already have a repertoire of digital resources and am comfortable using what I already know.

 
I have learned to use many technologies and how to incorporate them into my teaching in just a few years. But, since I haven’t had my own classroom yet, it is difficult to think about improving my practice and ditching old ideas for new ones! However, today it has truly been impressed upon me that there are still technologies worth finding because while I don’t want to be a teacher who shoves technology down her student’s throat, I want to be a teacher who can reinvent the classroom. After applications are made people discover how to use them in ways the inventor never even thought of. By synthesizing what I learn about new tools, perhaps I can discover a way to use them to transform the classroom in a way no one has thought of yet.

 
Standards Reflection
            Teachers using Jing meet ISTE-NETS-T’s standard 2, sections “a, c, and d,” by adapting a learning experience through a digital resource that can be used by students with diverse learning styles (visual, auditory) and diverse working strategies (whole group, small group, independent work) or that could be used for assessment purposes. They also meet standard 3, section “a” for demonstrating technological fluency by communicating with students using a video media format. Additionally, teachers meet standard 5, section “d” for evolves and renews classroom management in such a way that makes class time more efficient, teaching more effective and contributes to the vitality of homework.


Tuesday, September 11, 2012

Image Grab:Jing


Summary
While I found Microsoft’s Snipping Tool to be an efficient tool for capturing an image, I was frustrated with it pen feature; luckily, Jing has a similar tool that offers two things the Snipping Tool does not. Like the Snipping Tool, Jing allows the user to capture a cropped portion of his or her active screen and alter the picture for emphasis. Unlike the Snipping Tool, Jing has text, frame, and arrow features. Many color options are available to adjust the way these features look on top of an image. Additionally, Jing has sharing capabilities. Using the ScreenCast option, the user publishes their image online and makes it accessible with a ScreenCast URL.

What I Did
            To use Jing, I downloaded it for free to my computer and went through a quick and easy set-up process. During the set-up process, I chose to have Jing start up with my computer. Now, when I turn on my computer, a small sun appears at the top of my screen. Clicking on the sun allows me to capture a new image and to view my history. An image is selected as with the Snipping Tool, by holding down and dragging the mouse to highlight the area of interest. The additional features are used in a similar way. Once I found an image I could use, I captured it, added frames, arrows, and text, the pressed the ScreenCast button as opposed to saving it directly on my computer. I had to wait a moment for the process to be completed. Afterwards, I decided to save the picture for extra measure so I right clicked on the image and choose, “save as picture as....” Jing creates all images as PNG files.

How I Would Use It
            I’m certain there are a million things that could be done with this tool. However, I think I would use it most to present labeled images to my future elementary students. For example, to teach the vocabulary associated with the features of coastal erosion for an oceanography unit, I can frame the features I want students to be familiar with, differentiate them by using a different color for each, and draw labels with vocabulary words using the text feature. To make sure no one gets confused, I can add arrows from the text boxes to the frames to make it clear.


I import Jing images just as I would any other image. After I have saved a Jing image and while I am creating a blog post, I click on the image of a Polaroid photo on my Blogger post tool bar which gives me the option to browse my files in My Computer. I find the image I want and select “Open,” then “Add Selected.” The image then appears within my post.
 
To access and capture free photographs I used Foter which provides hundreds of beautiful, quality photographs organized within searchable categories.

 Q&A
How/where do you save images on your computer?
Using Print Screen, the Snipping Tool, and Jing allows me to capture images to save to my computer. The Snipping Tool and Jing provide a saving option. Using this option, I usually choose to save my images to either “Pictures” or “My Documents” within My Computer. Otherwise, I simply save images by right clicking on the image using my mouse, and choosing “save picture as…”

How do you access you Jing history?
The little sun that appears when I have Jing open gives me three options when I scroll my mouse over it. Clicking on the center option will open up my Jing history. Here I can view, share, or delete any of the Jing images I have created.

How do you publish your artifact?
After creating my artifact, I can publish it by choosing the ScreenCast option. I can do this in at least two places. Just after selecting the image I am served the option to create the ScreenCast. Or, I can save the image and access my image in my Jing History where it once again gives me the option to create the ScreenCast.

What happens if you ScreenCast an item in your history?
The image I created opens up in a new window. Here I can copy the URL to the ScreenCast. This allows me to paste the ScreenCast in a location where it can be referenced by others.

How do you share your artifact with others?
To access my first image through ScreenCast, click here.        
To access my second image through Screen Cast, click here.

Standards Reflection
Using Jing to design new, digital resources that facilitate student learning applies to ISTE-NETS-T’s standard one part “a” and standard two, parts “a” and “c.” When a teacher is able to take a product and adapt it using digital tools, such as Jing, to create a new learning tool based upon their subject matter knowledge, they are not only meeting these standards but demonstrating their ability to think creatively, use tools innovatively, and invent new learning products. Such activity is bound to inspire young minds!

Sunday, September 9, 2012

Social Bookmarking: Diigo

Summary
            All Internet browsers allow users to save, organize, and gain easy access to their favorite websites but Web 2.0 technology has combined bookmarking with social networking to bring Internet users social bookmarking. One such social bookmarking site, Diigo, provides a browser add-on, allowing users to highlight, comment, bookmark, and share (through facebook, twitter, and email) webpages and online articles. But, that only describes its bookmarking capabilities. Diigo provides an online library where bookmarks are stored. This library can be accessed by the public, other Diigo users, or by friends (depending upon the user’s privacy settings). Diigo makes bookmarking social by connecting users with content and people based on location, language, and content preferences. Groups can be created through which “members” can collect and share digital information for a common goal: to provide resources, to inform, to open discussion, etc.

What I Did
            A user can decide how extensively they which to make use of Diigo’s services. Diigo’s website offers videos for general information and tutorials to get you started. Before I began using the site I viewed this Youtube video which introduced me to Diigo’s most basic features and encouraged me to use its more social features for a greater experience.

To get started, the video recommended 1) using the browser add-on to highlight and annotate online articles, 2) using the add-on to bookmark those articles and tag them using keywords, and 3) using the personal library to organize bookmarks in lists.

To use the site’s more extensive features, the video recommended 1) checking out what Diigo friends are interested in, what interests are shared in common, 2) messaging Diigo friends and 3) participating in groups.
 
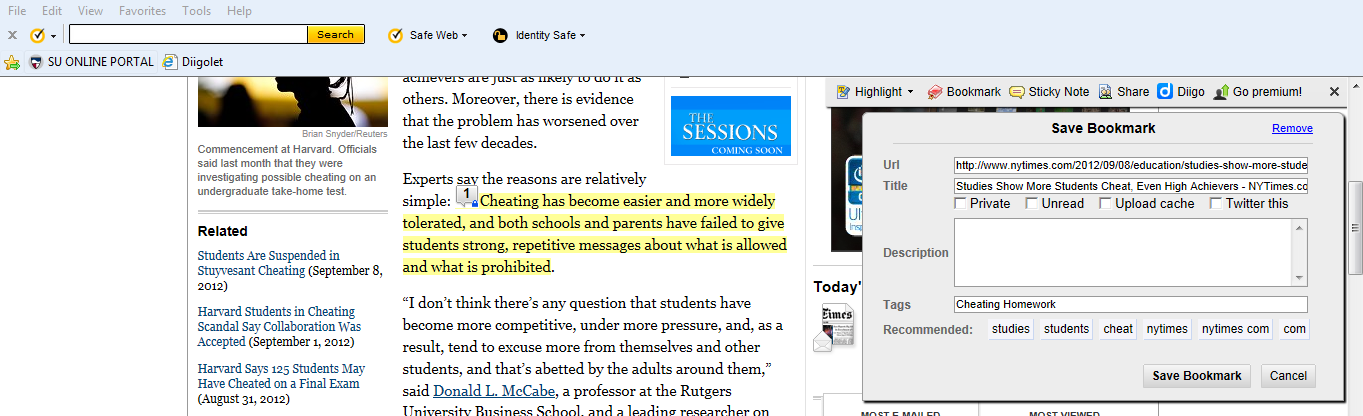
After registering for Diigo, I updated my profile, setting preferences that will allow Diigo to make suggestions for me, I adjusted my settings to provide me with a comfortable level of security, and I began searching for interesting articles to read online. Once I found an interesting article, I clicked on the Diigolet add-on, I clicked on bookmark which allowed me to add a title, description, and tags. Then I highlighted and added comments throughout the article to sections I found particularly important or intriguing. I went into my Diigo library. I was interested to see that not only did the title of the article, its description, and its tags appear, but everything that I highlighted and all of my comments appeared as well.


The ability to see these things, I believe, makes the tool very valuable although, I think that as I add more articles, the page will become difficult to look at and sort through. It seems that the list feature may come in handy to midigate this problem.

To see my public Diigo library click here.

Q&A
What is Web 2.0?
Web 2.0 is different from previous stages of the web as it is based on user generated content as opposed to serving content created for users. Web 2.0 combines social media and publishing techniques in ways that enable users to collaborate in virtual communities with the purpose of sharing information.

What is social bookmarking?
Social bookmarking sites are for Internet users to acquire, archive, tag, and share online resources within an online community.

What are advantages to social bookmarking?
The World Wide Web expands by the second. Somewhere online is the relevant, informational, or interesting resource I’ve been looking for. Once I find it by sifting through all the sites that don’t meet my criteria, instead of keeping it to myself, I can share this resource with others through social bookmarking. The process of online research is then streamlined for others who have the same interests and needs that I do.

What is a browser add-on and why are they useful?
Browser add-ons are tools that appear in one’s Internet browser that provide additional functionalities for online sites and applications such as Amazon’s “Add to Wish List” button. They are allow  popular websites to be used in effective and efficient ways that work for the user.

What browser do you use?
            Internet Explorer.

What is your experience with browser add-ons?
            I have had very little experience with browser add-ons.
 
Did you get your add on to work?
            Yes.
 
What browser add-ons are you currently using?
            Internet Explorer Bookmark, Diigo, Norton Security. 

How I Would Use It
Age restrictions apply to many social media sites and their use is therefore inappropriate in schools. For this assignment, I read an article that suggests this tool may motivate school age students to read and encourage them to participate in discussions about readings. This may be true for high school students but I would be weary of using such technology (parent permission would be required) and it certainly has no place in the elementary classroom. However, if used by staff and faculty within a school system, professional development would be put on a fast track. Online resources for classroom use and recent research in the field could be shared and debates could be raised over important issues through a Diigo group by colleagues.

Standards Reflection
            A teacher using Diigo would be meeting Standard 5 of the ISTE-NETS-T standards, particularly sections a, c, and d. When teachers communicate and share ideas regarding teaching and learning with others through Diigo, especially when networking in a group, they are teaching and learning in a virtual place with multiple communities. As they research articles and read articles found by others, they are thinking critically about information that could influence their practices in the classroom. If teachers in a school or school system participate and collaborate within a Diigo group, they are promoting the modern advancement of their school community and classrooms.

Friday, September 7, 2012

Self Portrait: Picassohead

The internet is not just for publishing works of literature, it’s for displaying art!

Summary
Expressing yourself can be difficult, but not when you have the internet at your fingertips, especially with websites like Picassohead. Picassohead offers a digital canvas and supplies the user with facial features that almost look like they have been copy and pasted from Pablo Picasso’s paintings. The possibilities are endless as you can use color on, rotate, resize, and flip each feature. If you look past the apparent uses of each feature it is possible to create complex facial characteristics and express complex emotions.
 
Before creating my own Picassohead, I looked at the website’s gallery. I was surprised at some of the ways people thought to use the creation tools. I knew that I had to be open minded about my approach if I wanted to create something unique like my fellow artists. Using mostly the eyebrow feature, I created the portrait displayed left.

To view my portrait on the Picassohead website click here.

            While my Picassohead may not look like me, it represents me in two ways 1) I made a curtain with lips to illustrate a stage; I’m a dancer and love to perform and 2) I went for a symmetrical look instead of taking a cubist approach as Pablo Picasso may have; I feel most comfortable when things are orderly.

           This website was fun to use as I didn’t even know exactly what my portrait was going to end up looking like. At the start, I was going for unique and original. I tried to look at the facial features in unique ways and to use them differently. To my surprise, I ended up with the most typical looking female! If I were to create another Picassohead, I’m sure it would wind up looking wildly different.

Learning Objective
            At one point during the creation process, I got frustrated that I could not move features once I placed them on the “canvas.” I would try to move a small object and the boarder of a larger object made it impossible for me to access what I wanted. However, I discovered that by sending the larger feature backward, I could access the smaller one. I had a feeling this would work as I am familiar with using the “Send to Back” and “Send to Front” options available for pictures and clip art in Microsoft Word and PowerPoint.

How I Would Use It
            Ice breakers can help you and your students to feel more comfortable at the start of a new school year and encourage classroom community. Since Picassohead has three step directions and only requires the use of a mouse, it is a simple, low-risk, activity for the computer lab which can allow students and even the teacher to introduce themselves to a new class.

Standards Reflection
            Picassohead.com is a virtual art gallery that can store your very own online creations. Using this tool in the classroom would meet Standard 1 “b” of the ISTE-NETS-T’s standards. Creativity is often expressed when old ideas are synthesized to create something new. By encouraging students to use this tool, students will become inspired by the ideas of a famous artist to express themselves and their ideas in ways never seen before. By stretching students’ imaginations through creativity, they are set on the road towards innovative and inventive thought.

Wednesday, September 5, 2012

Résumé Revisit: Rezscore

Summary
While creativity can be a good thing when it comes to the design of a résumé, there are some “rules” that should be followed when it comes to things like length, order, and language. When I originally created my résumé I used books and online templates for guidance. However, I have recently been told my résumé was too long. In anticipation of the coming school year, I set up an appointment with Career Services in order to gain advice on making my résumé shorter (one page instead of two) and more presentable. I was complemented on the impact of my descriptions and was given the following suggestions.

·         “Honors” and “Activities” go near the end
·         List “Honors” and “Skills” one-by-one for easy reading
·         Align dates to the far right for easy reading
·         Dates should be specific if possible (i.e. saying Oct-Dec is better than Fall 2010)
·         Bold degrees earned and put them before educational details (this is what you want to stand out as your most significant accomplishment)
·         There is no need to mention President’s list or Dean’s list if you graduated with        honors (it’s implied)
·         There is no need to create two categories for “Skills” and “Languages”
·         Descriptions are not needed for volunteer positions held

In addition to addressing the above, I also update my résumé to reflect my current status. I changed my email address, my home address, I included my graduate education, and I put the action verbs of my last job in past tense. Last but not least, I updated the “Skills” section with newly learned technologies!

            Additionally, I uploaded the original document to Rezscore. This website, through three easy steps, provides instant feedback on résumé quality. It will show a graded score and commentary regarding what was done well and what would make it better. After uploading my document, checking the “Resume Help” box, and clicking the “Submit” button, I was served this screen.

www.rezscore.com
My résumé was placed in the 87th percentile and it was suggested that it could be improved by making it more concise and impactful with vivid language. Rezscore also sent me an email (although I did not ask them to or provide them with my address other than including it in my résumé) explaining that I scored 82 out of 100 for brevity, 90 for impact, and 99 for depth.

After revising my résumé, I submitted the revised copy to Rezscore, receiving the same grade and suggestions. However, the breakdown was different: 71 for brevity, 99 for impact, and 99 for depth. While I agree that my résumé is not as brief as it could be, I am happy with the extent to which it represents my accomplishments and do not feel that I could minimize it further without taking out meaningful content.  

What I Learned
After completing this activity, I now have a revamped résumé that I will be confident to send to my dream school. It can be hard to see deficiencies in things that you have personally created but, a professional should have the gumption and sense to consult higher-ups, experts, or colleagues to ensure that what they make available to others is the best possible product. Also, professionals should never be scared to make changes. In this day and age, nothing stays the same for long. Expectations change with the rise of knowledge and innovation. Products such as résumés and lesson plans should continuously be updated and revised.

            In regards to technology, I learned just how easy it can be for the Internet to scan, retrieve, and use your personal information. When I uploaded my résumé documents to Google Docs I was careful to obscure my address and phone number. However, I mistakenly uploaded the unprotected documents to Rezscore. This website and the people involved now have all of my personal information and know more about my history than any of my Facebook “friends.” I thought I was a knowledgeable and safe Internet user, but since this activity, I have learned to be more aware and careful. From now on, I will slow down and think carefully about what it is I use the Internet for.

How I Would Use It
            No professional can get very far in the working world without a well done résumé. Don’t let a poor résumé keep you from making a difference in our schools. If you are working towards professional development, you will always have something new to add. Use Rezscore safely to ensure that your accomplishments stand out and don’t go unnoticed.

Standards Reflection
            In aligning this activity with an ISTE-NETS-T standard, I would have to choose Standard Five. Since high school I have been doing what I can to develop skills that I can contribute to a school community’s effectiveness, vitality, and self-renewal. Almost all of these things appear in my résumé. As I gain steam in the educational community I hope for my résumé to also demonstrate my commitment to professional improvement and lifelong learning. These are qualities that Standard Five requires to prove in conjunction with the use of technological tools and resources.

Fixing a Résumé

           A résumé must make a good first impression. You wouldn’t walk into an interview with unkempt hair and a sloppy outfit would you? Likewise, you shouldn’t send out an untidy looking résumé. A résumé should catch an employer’s eye and keep them reading. In order to create a résumé like this, it is necessary that one is familiar with the ins and outs of technology applications used to create résumés. While creating a résumé one may choose to create headers, adjust formatting, change text size and color, create text boxes, create dividers, and more. In this respect, creativity is your best asset and your ability to show creativity also demonstrates your level of digital literacy.

To me, creating the perfect résumé is touchy business. Résumés travel and speak to people about who you are, what you have done, what you are doing, and what your future holds in store for you. In short, when someone sends out a résumé, they are sending out an extension of themselves. Yet, a résumé goes through much critiquing before it is able to snag you that interview you were hoping for at that school where you have always want to work. As a student at SU, my résumé will have been critiqued by career services, professors, peers, and a website before it is seen again by a school principal. Further, nearly everybody has an opinion regarding what makes or breaks a résumé and sometimes it can be difficult to take constructive criticism, especially when it involves something so personal and the need to revise something that is close to a piece of art.
 
This post is brought to you in anticipation of the publishing of my revised résumé.

Tuesday, September 4, 2012

Snipping Tool: Win/Mac OS

Summary
For various reasons I have used my computer’s “Print Screen” option to capture and share images of webpages for colleagues and students. One thing that must be noted about the Print Screen option is that, while pressing a few keys in order to capture, copy, and paste an image to share is a fairly simple task, with Print Screen, you end up capturing an image with superfluous details (the task bar, tool bar, scroll bar, etc.). To share an image without those details, you must find a way to crop the image which can take time and effort.
 
I was not aware until now that another option was available; the Snipping tool allows users to capture a cropped image of their active computer screen. With just seven major options, there is very little that is complicated about this tool. In addition to being able to select only the details you really care about, it also allows you to write a message and highlight text (there is also an eraser tool for undoing changes). My immediate reaction upon discovering this was, “Cool!” But, after practicing with it, I decided it was just okay. I’m not sure when I would really make use of the pen feature as it requires a significant amount of dexterity in order to create reasonably sized marks that resemble anything close to the English language. The computer's mouse is used to draw and works best to create simple exclamation points, question marks, and arrows. This tool would be significantly more useful if it included the ability to create text boxes such as those that can be created with applications like Paint and Word.
 
What I Learned
            Efficiency is key. Previous to discovering how to use the Snipping tool, I would use the Print Screen key, open PowerPoint, paste the image, find the cropping tool, crop the image, and enlarge the image. If the image wasn’t needed in the PowerPoint, I would then copy and paste it elsewhere. I almost can’t believe I have spent so much of my time going through this process. In the future, I will know to use the Snipping tool unless I need perfectly straight arrows or neat text.
            While the Snipping tool may prove to be an efficient tool for grabbing, collecting, and sharing educational materials, Snippers must be aware that copyright rules may apply for snipped images and text. I believe that I still have to learn where some of the fine lines between sharing and copyright infringement lie.

How I Would Use It
            Along with the pen, highlighter, and eraser options, users are able to save, copy, and send (email) their image. These options give the user the ability to either immediately embed an image in a project or to save it independently. The duel capability of this tool, I believe, is what makes it most versatile. For instance, I would use this tool to abbreviate lessons that rely on websites by selecting the most relevant paired images and text that is needed to introduce an idea, supplement students’ knowledge, or evoke curiosity and critical thinking.

             The Internet is full of great learning resources for kids but often there are not enough computers to go around or not enough time to get the class down to the computer lab. Information from these sites can still be utilized by teachers and students when the Snipping tool is used to selectively extract images and text. The snipped images can be used alone, in presentations, or on worksheets. Using the tool in this way can help teachers keep their lessons focused on what is most important, eliminating the temptation for teachers and students to become distracted by links and eliminating the possibility students will become enticed to surf the web.

             For instance, Time for Kids provides free articles and polls online. Stories can be snipped,


highlighted, and presented, or polls can be used for persuasive writing prompts.


Since the formatting, colors, and images remain intact, snips are easy to read and fun to look at. Anything that is irrelevant to the lesson can be blacked out using the pen feature.

What I Did
           While searching the web, I found something I would love to share with my students and include in a lesson. I then found the snipping tool, previously hidden away in the dark recesses of my computer, by searching through my programs in my start menu. After clicking on the tool, I was glad to see that I was served one direction ("drag the cursor over the area you want to capture"), short and simple! I was then able to choose the type of "pen" I wanted to draw with and the color. I made the image relevant to my needs by coloring it in using my mouse and saving it to my computer.
 
Standards Reflection
          This use of this tool meets ISTE-NETS-T’s Standard 1,  “b” and 2, “a.” Stories and articles such as those found on sites like “Time for Kids” are forms of digital literature that reveal real-world issues. They draw attention to these issues and with appropriate scaffolding from teachers, can be used to incite authentic problem solving from students.  In addition, while students may be engaged in learning experiences on individual computers, similar learning experiences can be had if teachers adapt websites’ resources for individual, small group, or whole class learning by providing snippets of the resources through alternate mediums.